Application development tutorial
This tutorial explains how to write a simple application for Apla.
The goal
The goal of this tutorial is to create an application for Apla.
The application starts simple and grows in complexity as the tutorial progresses.
The final version of the app stores simple messages (strings) in a table with a timestamp and a message sender’s account identifier. A user can access the list of messages and add new messages from the app’s page. The app’s page can be accessed from the ecosystem menu.
Part 1: The environment
quick-start
This tutorial uses Apla quick-start. The quick start provides docker containers for five network nodes. Each node has its own backend, database, and client. The manage.sh script can be used to control the nodes.
For installation instructions, see the quick-start README on GitHub.
Molis
Molis is a single unified client for Apla. Molis provides funcionality for all user and ecosystem roles. Application developers develop and test applications in Molis. Ecosystem administrators use Molis to manage ecosystems. Users can interact with ecosystem apps via Molis.
For this tutorial, you’ll be writing contract code, page template code, and performing all other actions in the Molis client. Molis also provides a way to retrieve, save, and execute contract code, manage data structures (tables), assign access rights, and create applications.
Molis client is installed as a part of quick-start. Each node has its own Molis client instance.
Part 2: What is an app
App components
Apla apps are a combination of their resources: contracts, tables, and user interfaces. United into a single app, resources usually implement a certain functionality or a business process. An app and all its resources (except data stored in tables) can be exported and imported to other ecosystems.
Contracts
Contracts are like functions. They take input parameters, validate these parameters, and perform defined actions.
Contracts are written in Simvolio language.
Tables
Tables hold information that is used by contracts and user interfaces.
Tables are regular database tables: you can query, update, and insert. These actions are performed with three Simvolio language functions: DBFind, DBInsert, and DBUpdate.
User interfaces
User interfaces are pages and menus that will be displayed to users by Molis.
The interfaces are written in Protypo language. Molis provides a visual editor for constructing interfaces.
The blockchain
All operations with contracts, tables, and interfaces are stored in the blockchain. A transaction is created for an operation. This transaction is then validated and executed in a virtual machine on all blockchain network nodes. Thus the state of resources is the same for all network nodes.
For example, if you change the contract code and save the changes, Molis creates a transaction that introduces the contract code change. After the transaction is validated and included in the blockchain, the new contract code becomes available to all nodes in the network. Same principle applies to tables and data stored in them, and to user interfaces.
Resource Access
The architecture of Apla apps is designed to be modular. Contracts, tables, and interfaces can be used by many different apps.
An app is a collection of its resources: contracts, pages, and tables. All resources of all apps within one ecosystem are available to each other. One resource can be used by many apps. Resources do not need to belong to a same app to be accessible.
For example, a dashboard page can use many tables that store information about ecosystem members and business processes; a contract can update several tables that are used by many ecosystem apps.
Access to resources is managed with access rights, which are implemented with contracts.
Part 3: The contract
You now have your network of five nodes and a basic understanding of what is an app and how apps work. Your first application will start as a simple “Hello, World!” application.
The spec
The application stores a single string in a table. It doesn’t have any user interface.
Founder’s account
The “root” privileges for an ecosystem are available to accounts with the Admin role. By default, this role has access to all operations. In a new ecosystem, Admin role is assigned to the founder’s account. You must use this account to introduce major changes to the ecosystem, such as creating new apps and tables.
To login to the ecosystem with founder’s account:
Make sure that quick-start is running. See quick-start README for more information.
Run
$ sudo ./manage.sh start-clientsThis command starts Molis clients for all nodes.
One of the started clients is for the founder’s account. This account lets you select roles after logging in. Choose Admin.
Password for all accounts is
default.
New app
Once you are logged as ecosystem’s founder, you can create a new app.
To create a new app:
Go to the Admin tab.
From the list on the left, select Application.
In the Applications view, select Create.
Specify the name of your app in the Name field.
In the Change conditions specify
true.The
truevalue will make it possible for anyone to change the app.Another option is to specify
ContractConditions("MainCondition"). This will forbid application changes to anyone except the founder.Your app will appear in the list of apps. Click select to make it active.
Note
Selecting apps in the Admin tab makes it easier to navigate resources related to the selected app. It has no effect on the ecosystem. All ecosystem apps will still be available, no matter which one is selected.
New table
To store data, the application needs a table. Create this table from Molis.
To create a table:
On the Admin tab, select Resources > Tables.
This will display all tables for the selected app. The list will be empty, because your app doesn’t have any tables yet.
Click Create.
Molis will display the Create table view.
Specify a name for your table in the Name field.
This tutorial uses
apptablename for the table.Add a column. Name it
messageand set its type toText.As a result, the table must have two columns:
id(predefined), andmessage. You will add more columns later.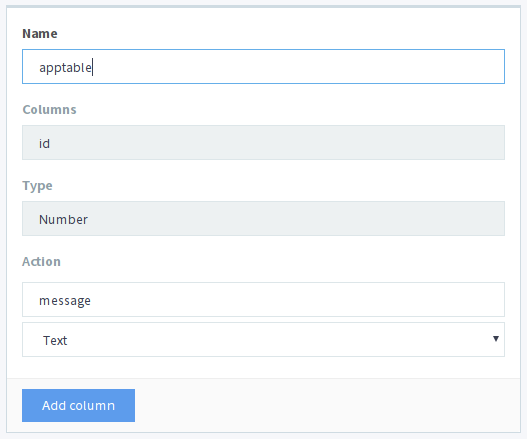
For write permissions, specify
truein every field.This will allow anyone to perform inserts and updates on the table, and to add columns.
As an option, you can restrict writing permissions to the founder account. In this case, specify
ContractConditions("MainCondition")in this parameter.
The contract
Contract code sections
Every contract has three sections:
dataDeclares the input data (names and types of variables).
conditionsValidates the input data.
actionPerforms actions defined by the contract logic.
Creating a new contract
On the Admin tab, select Resources > Contracts.
This will display all contracts for the selected app. The list for your new app will be empty.
Click Create.
A new contract template will open in the editor.
An empty contract template looks like this:
contract ... {
    data {

    }
    conditions {

    }
    action {

    }
}
Data section
Fill the data section. The app must write strings to the table, so a string type variable is needed.
In the example below, Message is the name of the variable, string is its type.
data {
    Message string
}
Condition section
Fill the conditions section. The single validation condition is that the specified string must not be empty. If Message length is 0, the contract will generate an alert with the defined message upon execution.
conditions {
    // avoid writing empty strings
    if Size($Message) == 0 {
        error "Message is empty"
    }
}
Action section
Fill the action section. The single action is writing the message to the table.
action {
    DBInsert("apptable", {message: $Message})
}
Full contract code
Below is the full contract code for this part.
All Apla contracts are constructed like this and always contain data, conditions, and action sections.
contract AppContract {
    data {
        Message string
    }
    conditions {
        // avoid writing empty strings
        if Size($Message) == 0 {
            error "Message is empty"
        }
    }
    action {
        DBInsert("apptable", {message: $Message})
    }
}
Save & execute
The contract is ready for testing:
In the Editor menu, click Save.
This updates the contract code. The updated version becomes available to all the network nodes.
In the Editor menu, click Execute.
This displays the Execute contract view.
In the Execute contract view, enter the input parameters for the contract.
The contract has one parameter,
Message, so specifyMessagein Key andHello, World!in Value.
Click Exec.
The results will be displayed on the right.
If the string was added successfully, the results will contain the block number of the transaction that introduced the change, and the error code.
{
   "block": "31",
   "error": null
}
Part 4: The interface
After the contract is working, it’s time to expand it into something more useful. In this part, you’ll be implementing the UI and extra functionality.
The spec
The app stores strings in a table, like entries in a log. Every string has an author and a timestamp.
A user can view the stored list of strings from the application page, which is a simple table at this point.
The app does not provide a way to add new strings from the UI yet.
New columns
Just like before, edit the table from the Admin > Resources > Tables view.
Add the following columns to the apptable table:
authorof typeNumberwith Update set totrue.This field will store the identifier of the author’s account.
timestampof typeDate/Timewith Update set totrue.
Updated contract
Update the contract code to handle author IDs and timestamps.
Author IDs are identifers of the ecosystem accounts. Timestamps are the date and time of the contract execution in the Unix time format.
Both of these values are provided by the predefined variables. Since there is no need to input or validate the predefined variables, changes are needed only in the action section.
Change the contract so that the author’s ID and the timestamp are written to the table when a message is added. The author’s ID is defined by $key_id, the timestamp is defined by $time.
action {
    DBInsert("apptable", {message: $Message, author: $key_id, timestamp: $time})
}
The page
For this part, the application’s interface is a simple page that displays information stored in the table.
Just like all other resources, UI pages can be created in Molis:
Navigate to Admin > Resources > Pages.
Click Create.
A visual editor will open in the new tab.
Designer’s view
The default page is empty. Fortunately, you can use predefined structures to fill the page quickly.
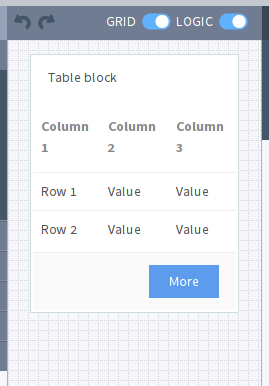
Create a basic table with header:
In the view selector on the right, click Designer.
The view will switch to the visual editor.
From the menu on the left, select Table With Header and drag it to the page.
A table with several elements will appear.
Developer’s view
User interfaces for Apla are written in Protypo. You’ll need to write code for the page, so switch to the developer’s view.
To switch to the developer’s view:
In the view selector on the right, click Developer.
The view will switch to the code editor with the page code.
Get data from the table
At the moment, the page template does nothing. Change the code, so that the page displays data from the apptable table.
To request data from a table, use the DBFind function.
The function call in the following exaple gets data from the
apptabletable, puts it into thesrc_tablesource, and orders it by the timestamp field. Thesrc_tablesource is later used as a source of data for the table view on the page.DBFind(Name: apptable, Source: src_table).Columns(Columns: "author,timestamp,message").Order(timestamp)
To display data from the
src_tablesource, specify it as a source along with a list of headers in theTablefunction.Table(Columns: "AUTHOR=author,TIME=timestamp,MESSAGE=message", Source: src_table)
In the view selector on the right, Click Preview to check that the data is displayed correctly.
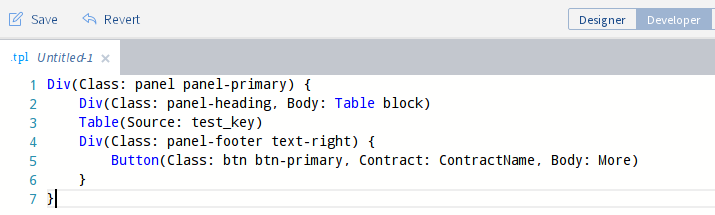
Full page code
Below is the full page code for this part. This basic page will be expanded later.
DBFind(Name: apptable, Source: src_table).Columns(Columns: "author,timestamp,message").Order(timestamp)

Div(Class: panel panel-primary) {
    Div(Class: panel-heading, Body: Table block)
    Table(Columns: "AUTHOR=author,TIME=timestamp,MESSAGE=message", Source: src_table)
    Div(Class: panel-footer text-right) {
        Button(Class: btn btn-primary, Contract: ContractName, Body: More)
    }
}
Save the page
Click Save to save the page:
- Specify
AppPageor any other name for a page in the Name field. - Leave the Menu option at
default_menu. - In Change Conditions specify
true. - Click Confirm.
Part 5: The app
In the previous parts you’ve created a contract, a table to store data, and a basic UI page to display this data.
In this part, you’ll be finalizing the app, so it looks and behaves like an actual application.
The spec
The app stores messages in a table, like entries in a log. Every message has an author and a timestamp.
A user can view the stored messages by opening the application page from the ecosystem menu. The default table view holds 25 mesages and provides a way to browse more.
A user can add new messages from the UI page, one message at a time.
The menu
A page is always linked to a menu. For example, the the default_page page that is displayed on the Home tab is linked to the default ecosystem menu, default_menu.
Because the tutorial app is small (just one page), there is no need to create an individual menu for it. A new menu item in the default menu will be enough.
Note
You can define what menu is displayed for the page by editing page properties in Admin > Resources > Pages. For example, if your app has several pages, you may want to create a menu to navigate between these pages and assign it to all pages of your app.
Add a menu item
Just like all other resources, menus can be created and edited in Molis:
Navigate to Admin > Menu.
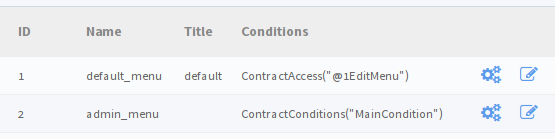
Click the edit button next to the
default_menuentry.A visual editor will open in the new tab displaying Protypo template for the default ecosystem menu.
Add a new menu item to the end of the template. This menu item will open the app’s page. The icon is from the FontAwesome icon set.
MenuItem(Title:Messages, Page:AppPage, Icon:"fa fa-envelope")
Click Save.
Test the new menu item
Check that the new menu item works:
Open the Home tab.
Click Refresh in the menu.
A new item titled Messages will appear.

Click Messages.
The app’s page will open.
Sending messages
Buttons in Protypo can execute contracts and open pages, depending on the arguments.
The Button function has two arguments for contracts:
ContractName of the contract that must be activated.
ParamsInput parameters for the contract.
Form
To send data to contracts, add a form to the app’s page. This form must have an input field for the message, and a button that will activate the AppContract contract.
Below is an example of such form. It is enclosed in its own Div. Place it after the Div element that holds the table view. The Input field of this form has a defined name, message_input. This name is used by the button to send Message parameter value to the contract. Finally, Val function is used to obtain the value of the input field.
Div(Class: panel panel-primary) {
  Form() {
        Input(Name: message_input, Class: form-control, Type: text, Placeholder: "Write a message...", )
        Button(Class: btn btn-primary, Body: Send, Contract: AppContract, Params: "Message=Val(message_input)")
  }
}
Test this new functionality by sending messages. You may notice that the table doesn’t refresh when a new message is sent. This is addressed later in this tutorial.
Table navigation
The default table view on the page will display only 25 first entries. Add a simple navigation that will allow users to navigate all table entries.
Variables
This navigation requires two variables to store the table view state:
#table_view_offset#This variable stores the current table view offset.
Navigation buttons will pass this as a parameter when reloading the page.
#record_count#This variable stores the total number of entries in the table.
This value will be calculated.
Record count
To calculate #record_count#, modify the existing DBFind function call. The variable specified in the .Count() call will store the record count.
DBFind(Name: apptable, Source: src_table).Columns(Columns: "author,timestamp,message").Order(timestamp).Count(record_count)
Table offset
The table view offset must be passed to the page when it is opened. If #table_view_offset# is not passed, it is assumed to be 0.
Add the following code to the top of the page template. This code uses conditionals. GetVar function checks if the variable is set. SetVar function sets the variable.
If(GetVar(table_view_offset)){
}.Else{
    SetVar(table_view_offset, 0)
}
Modify the DBFind function call again. This time it must use the new table view offset.
DBFind(Name: apptable, Source: src_table).Columns(Columns: "author,timestamp,message").Order(timestamp).Count(record_count).Offset(#table_view_offset#)
Button code
Buttons in Protypo can execute contracts and open pages, depending on the arguments.
If you haven’t already done so, open the page in the editor, and delete the existing More button.
Afterwards, locate the Div function call that defines the footer, Div(Class: panel-footer text-right). Add the button code to it.
Div(Class: panel-footer text-right) {

}
The Previous button will be displayed only if there is at least one step to go back to. The new table view offset for the page, offset_previous is calculated when the button is added. Parameters are passed to the reopened page in the PageParams parameter.
If(#table_view_offset# >= 25) {
    SetVar(offset_previous, Calculate(#table_view_offset# - 25))
    Button(Class: btn btn-primary, Body: Previous, Page: AppPage, PageParams:"table_view_offset=#offset_previous#")
}
The Next button will be displayed only if the total record count is more than what is displayed on the page. The new table view offset for the page, offset_next is calculated when the button is added. Parameters are passed to the reopened page in the PageParams parameter.
If(#record_count# >= Calculate(#table_view_offset# + 25)) {
    SetVar(offset_next, Calculate(#table_view_offset# + 25))
    Button(Class: btn btn-primary, Body: Next, Page: AppPage, PageParams:"table_view_offset=#offset_next#")
}
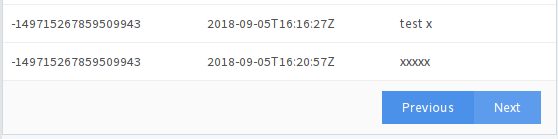
After the buttons are added, save the page and test it from the Home > Messages menu item.
Page refresh
One final functionality that must be implemented is the automatic update of the table located on the page. When a user sends a new message, it must be displayed in the table.
You can implement this by making the Send button re-open the current page in addition to executing the contract. The #table_view_offset# parameter must be passed to the page without changes.
Add Page and PageParams arguments to Send button code like demonstrated below.
Button(Class: btn btn-primary, Body: Send, Contract: AppContract, Params: "Message=Val(message_input)", Page:AppPage, PageParams:"table_view_offset=#table_view_offset#")
Full page code
This part introduced many changes to the application page template. Below is the full code for the app page.
If(GetVar(table_view_offset)){
}.Else{
    SetVar(table_view_offset, 0)
}

DBFind(Name: apptable, Source: src_table).Columns(Columns: "author,timestamp,message").Order(timestamp).Count(record_count).Offset(#table_view_offset#)

Div(Class: panel panel-primary) {
 Div(Class: panel-heading, Body: Table block)
 Table(Columns: "AUTHOR=author,TIME=timestamp,MESSAGE=message", Source: src_table)
 Div(Class: panel-footer text-right) {

  If(#table_view_offset# >= 25) {
    SetVar(offset_previous, Calculate(#table_view_offset# - 25))
    Button(Class: btn btn-primary, Body: Previous, Page: AppPage, PageParams:"table_view_offset=#offset_previous#")
  }

  If(#record_count# >= Calculate(#table_view_offset# + 25)) {
    SetVar(offset_next, Calculate(#table_view_offset# + 25))
    Button(Class: btn btn-primary, Body: Next, Page: AppPage, PageParams:"table_view_offset=#offset_next#")
  }

 }
}

Div(Class: panel panel-primary) {
  Form() {
        Input(Name: message_input, Class: form-control, Type: text, Placeholder: "Write a message...", )
        Button(Class: btn btn-primary, Body: Send, Contract: AppContract, Params: "Message=Val(message_input)", Page:AppPage, PageParams:"table_view_offset=#table_view_offset#")
  }
}
Conclusion
This tutorial stops at the point where you have the basic application for your ecosystem. It doesn’t explain other important topics for application developers like layout styles, access rights management and interaction between apps and resources. Please consult the rest of the documentation for more information about these advanced topics.